Example Site
Neon Max comes packaged with an example blog application that you can go through to get familiar with all the tools that comes with the starter kit as well as Neon Max's own unique functionalities and helpers. This section will help you go through the example application and explain each parts.
The Blog Site
The example website is pretty simple. It's basically a blog app where authenticated users can view, create, update, and delete blogs (or blog posts). It comes with implementations of Neon Max's Authorization helper, so only creators of a blog (blog post) can manipulate it (delete, update, etc.).
Structure
All the example code are included inside app/examples/blog. There are four pages:
app/examples/blog/page.tsx→ A list of all the blogs created by users.app/examples/blog/create/page.tsx→ A page for users to create their blogs.app/examples/blog/[id]/page.tsx→ A detail view of a particular blog post. This is where comments of a blog is shown and created.app/examples/blog/[id]/edit/page.tsx→ A page for users to update/edit theri blog.
Models
To support the functionalities of the example site, under prisma/schema.prisma, you will se some existing models:
User→ An important model used for authentication. Also used to determine the creator of a particular blog.Blog→ The blog itself.Comment→ For comments associated with a blog. Each blog has many comments.
Code
Server Actions
At app/examples/blog/page.tsx you can see an example of a server action... in action!
import { getBlogs } from "@/actions/blog";

const blogs = await getBlogs();
And if I go to actions/blog:
"use server";

// Retrieve all blogs
export async function getBlogs(): Promise<Blog[]> {
  const blogs = await prisma.blog.findMany({
    include: {
      author: true,
    },
    orderBy: {
      createdAt: "desc",
    },
  });
  return blogs;
}
As indicated by "use server", the exported functions in this file are server actions. This means the code runs on the server; that's why I can safely access prisma here. Also because this is a server component, I can immediately use the blogs variable and render the contents in the same app/examples/blog/page.tsx file.
<div className="bg-white shadow-sm rounded-lg">
  {blogs.length === 0 ? (
    <p className="text-gray-500">
      No blogs available. Please create a new one.
    </p>
  ) : (
    <ul className="flex flex-col gap-2 ">
      {blogs.map(async (blog) => (
        <li key={blog.id} className="p-4 border border-gray-200 rounded-md ">
          <div className="flex justify-between items-center">
            <div>
              <h2 className="text-lg font-semibold text-gray-800">
                {blog.title}
              </h2>
              <p className="text-gray-600 text-sm">
                {blog.content.substring(0, 100)}...
              </p>
            </div>
            <div className="flex space-x-3">
              <Link
                href={`/examples/blog/${blog.id}`}
                className={cn(
                  buttonVariants({ variant: "outline", size: "icon" })
                )}
              >
                <Eye className="h-4 w-4" />
              </Link>

              {(await Authorization.allows("can-edit-blog", blog.id)) && (
                <>
                  <Link
                    href={`/examples/blog/${blog.id}/edit`}
                    className={cn(
                      buttonVariants({ variant: "outline", size: "icon" })
                    )}
                  >
                    <Pencil className="h-4 w-4" />
                  </Link>
                  <form action={handleDelete} className="inline-block">
                    <input type="hidden" name="id" value={blog.id} />
                    <Button type="submit" variant="destructive" size="icon">
                      <Trash className="h-4 w-4" />
                    </Button>
                  </form>
                </>
              )}
            </div>
          </div>
        </li>
      ))}
    </ul>
  )}
</div>
Authorization and Policy
There's a lot to unpack here. Firstly, the authorization check with Authorization.allows(). Authorization is a helper class that lets you register policies based on the authenticated user. In the example, Authorization.allows("can-edit-blog") checks the app's list of policies/authorizations to see if a "can-edit-blog" policy exists, and, if it does, does the configured check based on the user.
If you head over to config/authorization.ts, you'll see the list of preconfigured policies. Right now it only has "can-edit-blog". And that's exatcly what's being used. If Authorization.allows("can-edit-blog") returns true for the current authenticated user, it will display the "delete" and "edit" buttons.
Let's see what this policy is. Inside config/authorization.ts, I can see the entry for "can-edit-blog":
export const AUTHORIZATIONS: Record<
  string,
  (user: User, ...args: any[]) => Promise<boolean>
> = {
  "can-edit-blog": async (user, blogId: number) => {
    const blog = await getBlogById(blogId);

    if (blog && blog.authorId === user.id) return true;

    return false;
  },
};
As you can see, this authorization checks if a user is the owner of a blog with the provided id by checking user.id with blog.authorId. If it doesn't match, it return false. Meaning the user cannot perform the action. This is an example of using the Authorization helper class. For more information on it, go to the "authorization" section.
Protected Page
If you head over to app/examples/blog/create/page.tsx, you'll find this piece of code:
await Auth.authenticated();
This code uses the Auth helper class to prevent unaunthenticated users to visit this page. What this method does is check if there's an active session (meaning the current user is logged in), and if there isn't, redirect the user to the login page defined at config/auth.ts.
Validation and Errors Helper
In app/examples/blog/create/page.tsx, there's a server action directly defined inside the server component:
async function handleCreate(formData: FormData) {
  "use server";
  const title = formData.get("title") as string;
  const content = formData.get("content") as string;

  const validationResult = Errors.validateZod(blogSchema, { title, content });

  if (!validationResult.error) {
    await createBlog(title, content);
    revalidatePath("/examples/blog");

    redirect("/examples/blog");
  } else {
    redirect("/examples/blog/create");
  }
}
This server action calls another server action createBlog. It should be noted that the logic inside this server action could've easily have been included right in createBlog, but this code is meant to highlight that you can create server actions in many places.
But the more important part to look at here is the use of the Errors helper under lib/errors.ts to validate the values from the form to create the blog before passing it over to createBlog. As you can see there's the line const validationResult = Errors.validateZod(blogSchema, { title, content }). This code takes in a zod schema and one or more values to validate against the said schema.
It should be noted that this helper method should only be called on the server. Under the hood, what this method does is send errors cookies, which will have properties based on the schema on which validateZod was used.
For example, the above handleCreate action checks if the method returns any error. If it does return an error, validateZod will have already set the cookies to be used in the next request and the user will be redirected back to the create blog page. Inside this page, we will anticipate that we might have some errors cookies:
<ErrorMessage message={Errors.get("title")} className="mt-4" />
<ErrorMessage message={Errors.get("content")} className="mt-4" />
Neon Max provides a conveniennt component to display errors called ErrorMessage. But a more important part of the above code is the use of the Errors.get() method. This directly corresponds to the validateZod schema method. In the handleCreate method, we validate the fields name and content against a schema. If validation fails on either of those fields, we well get corresponding errors via the errors cookies. We can access these error messages with Errors.get() as has been used to supply ErrorMessages message property.
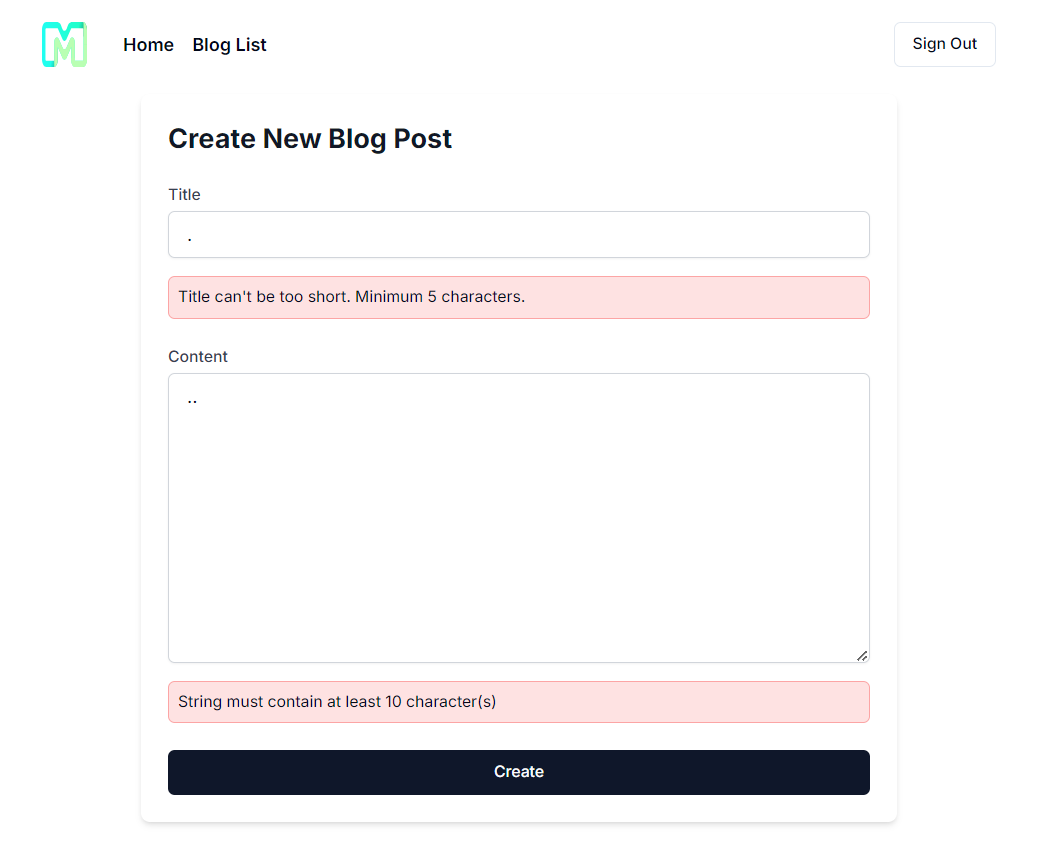
If you fail a validation against the schema, you will see something like this:
Client Component
All of the examples so far have been in server components, but in app/examples/blog/Comments.ts, you'll find a client component named Comments. This component could've very easily been created as a server component but is included to show that client components are also easy to build with.
Prisma Type Extraction
A pretty neat feature by Prisma that should be mention is the ability to extract a type based on a query to the database. The comments state is declared as the type:
Prisma.CommentGetPayload<{
   include: {
   author: {
       select: {
       name: true;
       };
   };
   };
}>[]
This is a direct reflection of what I use to fill setComments:
const comments = await getAllComments(blogId);
setComments(comments);
getAllComments is a server action:
// Get all Comments
export async function getAllComments(blogId: number) {
  const comments = await prisma.comment.findMany({
    where: {
      blogId,
    },
    include: {
      author: {
        select: {
          name: true,
        },
      },
    },
  });
  return comments;
}
As you can see the query is the same as the type defined for comments state. You get CommentGetPayload and provide it with the query you plan to fill that state with. In the example, comments are fetched as well as their corresponding authors, but the author's other fields are not necessary; that's why the query is limited using select to only return the author's name.
useSession to Get Session User in Client Components
This section is just to highlight that you can use NextAuth's useSession() to fetch the currently logged in user (if there's any). In the Comments component, only status (returned from useSession) is used to determin if the current user is authenticated. If they are, the form to create comments is displayed; otherwise the user will be prompted to login.